
Email signatures work as online business cards that improve your professional communication. If you're wondering how to add signature in Outlook, it's vital for creating a consistent and professional experience in your emails while reinforcing credibility among your recipients. This complete guide on how to add signature in Outlook discusses signature creation across all platforms of Outlook, ensuring your emails leave a lasting impression on investors, colleagues, stakeholders, customers, and more.
What Do We Mean by Email Signature in Outlook?

In Outlook, an email signature can be considered a personalized block of image, text, or formatting that automatically gets placed at the end of your outgoing messages. This feature enables users to include important contact information, company branding, professional titles, and marketing components in all emails sent.
Essentially, in Outlook, email signatures can contain:
- Your name as well as your designation.
- Contact details, including addresses and phone numbers.
- Branding elements and logos of the company.
- Website URLs and social media links.
- CTA buttons and marketing banners.
- Confidentiality notices and legal disclaimers.
Modern email signatures have changed a lot and gone beyond straightforward text blocks to become robust branding and marketing tools that improve professional identity with every sent message.
How to Include Your Outlook Signature in Desktop (Windows)
If you want to establish your digital signature in Outlook desktop, then you need to access signature settings via the application interface. The process involves generating, personalizing, and setting up your signature for automatic placement in your messages.
Detailed Process for Setup of Desktop
- Step 1: Open your Microsoft Outlook and log into your account.
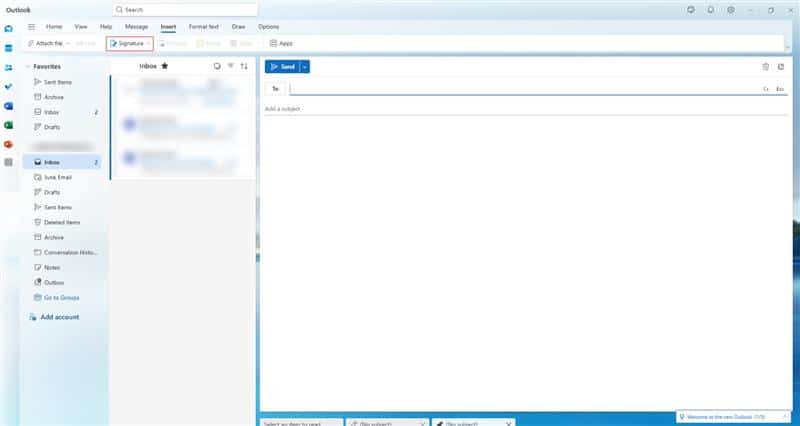
- Step 2: In the Outlook window, tap on the option “Mail,” which will be available on the left sidebar. Else, you can also tap on the option “New Mail” and then select the Insert option on the top menu bar and choose “Signature” and then “Signatures.”
- Step 3: Then, you will see the stationery and signatures dialog box; click on the “New Signature” option to start creating a new signature. Next, proceed to give a descriptive name to your signature in the specified dialog box.
- Step 4: Leverage the editing area to create content for your signature. You can add details such as your full name, designation, company details, and contact information utilizing the formatting toolbar. It also gives you the option to modify colors, fonts, and text alignment.
- Step 5: Set up default signature settings by choosing your newly generated signature from the list of dropdown options. Then, tap on the “Save” option to save changes. Now, your new signature will appear on all your new messages as well as forwards and replies.

Professional Elements of Signature
A professional-looking Outlook signature must be able to integrate these vital components:
- Full name as well as title.
- The name of the company as well as the department.
- Main email address and phone number.
- Address of the business if relevant.
- URL of the website as well as social media profiles.
- Logo of the company appropriately positioned.
How to Include a Signature in Outlook.com and Outlook Web?
Outlook platforms available on the web provide capabilities for creating signatures. These capabilities look quite similar to desktop applications. All you must do is go into the account settings and then use the in-built signature editor for personalization.
Signature Creation in Outlook Web Apps
- Step 1: Log into your account at Outlook.com. You will see a gear icon present on the top-right of your screen. It represents the settings option. Click on it.
- Step 2: Next, you need to go to the Mail settings and choose the option “Compose and reply” from the left-hand side menu. After that, you must go to the Account settings and then choose “Signatures”.
- Step 3: Next, in the section of “Email Signature”, you can utilize the text editor to start generating your signature content. The formatting toolbar provides options for “color changes”, “font selection”, and “text styling”.
- Step 4: Set up an automatic signature application by choosing the checkboxes for replies/forwards and new messages. This makes sure there is consistent placement of signatures across all communications.
- Step 5: Save the changes in your signature settings by selecting the “Save” button at the end of your settings page. You will then automatically start to see your signature in all your messages.
The above steps can vary depending upon the version of Outlook you are using.
Additional Options for Formatting
Outlook web platforms provide support to sophisticated signature features such as:
- HTML formatting for improved visual appeal.
- Insertion of images for professional headshots and logos.
- Creation of hyperlinks across all websites and social media platforms.
- Customized color schemes and fonts adhering to brand guidelines.
- Structures of table for streamlined data layout.
Cross-platform Synchronization and Mobile Signature Setup
The Outlook applications across mobile devices provide capabilities for signature creation, relevant for those who regularly compose emails on tablets and smartphones. Mobile signatures get synchronized across all platforms of Outlook. This makes sure that there is total consistency in all levels of professional communication.
Configuration of Mobile Application
- Step 1: Find the Outlook app in the app store of your device. Proceed to download and install it. After that, log into your Microsoft account utilizing your sign in information.
- Step 2: On the top-left corner, locate the menu icon. Select it and then enter the app settings. Go down and choose the option “Settings” from the available options in the menu.
- Step 3: Select the option “Email Signature” to open the interface for signature creation. If you have created a signature on other Outlook platforms before, it will synchronize automatically with the mobile application.
- Step 4: Now, either generate the signature form scratch or change it via the available text editor. Ensure that mobile signatures remain concise because of limitations in screen size and touch-driven interaction.
- Step 5: Next, you can save your signature by selecting the “checkmark” option. The newly created signature will apply automatically to all composed emails on your mobile devices.
What Is the Cross-Platform Advantage for Global Users?
Modern enterprises work across numerous geographical regions and time zones, making consistent professional signatures vital for all corporate communication. Users in the countries like Canada, United States, Australia, United Kingdom benefit a lot from the synchronization capabilities of Outlook to ensure signature consistency across web, desktop, and mobile platforms. This makes sure that irrespective of whether you are replying to messages from your London office or writing emails during official trip to Sydney, your professional communication remains professional, consistent, and perfectly formatted across all platforms and devices.
Resolving Common Issues in Signature
Despite the user-friendly interface of Outlook, users encounter signature-driven problems occasionally that might need troubleshooting. Comprehending simple issues as well as their solutions aids in ensuring uniform professional communication.
Problems Related to Display of Signature
Missing Signatures: When signatures do not appear in the outgoing messages automatically, check the configuration and default signature settings to find out whether all the relevant options are selected. Go to the signature settings and make sure that your desired signature is chosen for new replies and messages.
Problems of Formatting: If your signatures look different than the ones you had designed, then it might be due to HTML compatibility issues. Leverage in-built editor of Outlook instead of external word processors to ensure consistency in formatting.
Problems Related to Image Loading: In your signature, professional headshots or logo of the organization can fail to appear because of hosting problems or file size limitations. Ensure that the image files remain under 100KB and make sure that it is properly embedded instead of being added as external links.
Optimization of Performance
In order to ascertain streamlined signature performance across various platforms:
- Ensure that signature length remains between 4-8 lines for professional-looking signature.
- Leverage basic web-safe fonts such as Calibri, Arial, or Times New Roman.
- Test the appearance of signature across distinct devices and email clients.
- Consistently update contact details and remove any non-essential elements.
- Track feedback on your signature and ensure necessary changes.
Conclusion
Understanding how to add signature in Outlook boosts your professional email communication and solidifies your corporate or personal identity. Irrespective of whether you are leveraging web applications, Outlook desktop, or mobile platforms, the creation of signature remains quite user-friendly and straightforward. Professional email signatures can work as effective marketing tools that can aid you in promoting your business, ensuring brand credibility, and providing vital contact information to recipients.
By adhering to comprehensive steps detailed in this guide, you will be able to create effective email signatures that showcase your professional standards and reflect your business aspirations. Keep in mind to consistently track, review, and change signature content to ensure relevancy and accuracy in professional email communications. Investing time and energy in crafting a professional email signature in Outlook yield good returns in the form of improved recipient engagement and brand recognition across all your email interactions.