

Most people don’t wake up excited to open Gmail. Instead, they brace themselves. Unopened newsletters. Client emails buried under promotions. Notifications from tools you barely remember signing up for. The unread count grows quietly, almost passively until one day it feels overwhelming.
You promise yourself you’ll clean it later. But here’s the uncomfortable truth: The problem isn’t the number of emails. It’s the lack of structure. If you truly want to learn how to organize Gmail inbox effectively, you need more than motivation. You need architecture. Gmail labels and filters are not just features; they’re a system for automation-first Gmail email management. Let’s design that system properly.
How to Create Gmail Labels to Organize Your Inbox (Step-by-Step)
Creating labels is not just about adding categories; it is about designing a clean and logical structure before automation begins. A poorly designed system will create confusion instead of clarity.
Step 1: Define Gmail Label Categories for Better Inbox Organization
Before touching Gmail settings, identify the main categories you truly need. Most inboxes function efficiently with five to eight core labels.
You may structure them by:
- Priority (High, Medium, Low)
- Work vs Personal
- Clients or Projects
- Financial (Invoices, Receipts)
- Updates and Promotions
Avoid the temptation to create highly specific labels for every minor situation. If you hesitate about where an email belongs, your structure is too complicated. Keep it simple and expandable.
Step 2: How to Create Labels in Gmail (Easy Setup Guide)
Once your categories are clear, follow these steps to create labels in Gmail:
- Open Gmail in your browser.
- Look at the left-hand sidebar where Inbox, Sent, and Drafts are listed.
- Scroll down and click on “More.”
- Click “Create new label.”
- Enter a clear, concise name for your label.
- If necessary, choose “Nest label under” to create a sub-label.
- Click “Create.”
Your label will now appear in the sidebar and is ready for use. Do not build a complex system at this stage. Repeat this process only for categories that are essential.
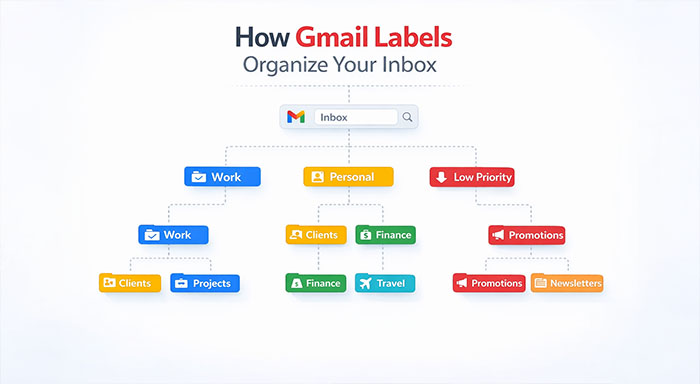
Step 3: Use Nested Gmail Labels for Structured Email Organization
Nested labels help you organize related categories under broader headings. This creates clarity without overcrowding the sidebar.
For example:
Work → Clients → Projects
Personal → Finance → Travel
Low Priority → Promotions → Newsletters
Stick with two levels of nesting; it’s enough for most cases. Three levels often introduce unnecessary complexity. Your architecture should feel intuitive at first glance.
Step 4: Use Gmail Label Colors to Identify Important Emails Faster
Color coding speeds up how you scan information. A good color system lets you spot important emails in seconds.
To assign colors:
- Hover over a label.
- Click the three-dot menu.
- Select “Label color.”
- Choose a color that represents its importance.
For example: Red for high priority, green for finance, or blue for work. Use colors sparingly. Too many colors reduce clarity rather than improve it.
Step 5: Test Your Gmail Label System Before Applying Filters
Before setting up filters, manually assign labels to 10–15 recent emails. This helps you evaluate whether your structure makes sense.
Ask yourself:
- Does categorization feel natural?
- Are some labels overlapping?
- Is anything unnecessary?
Adjust your architecture now. Automation should support clarity, not confusion.
Gmail Filter Setup: Automatically Organize Emails in Gmail
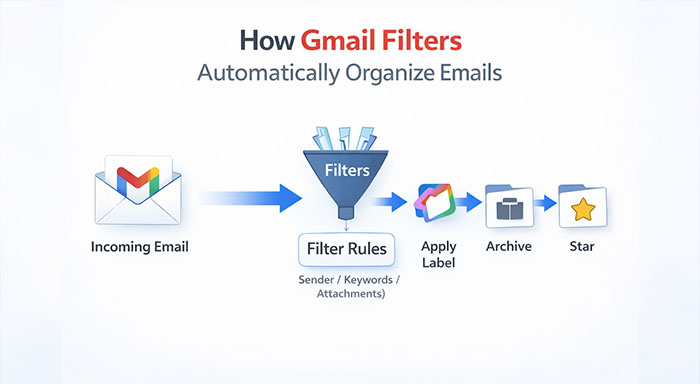
With your label architecture in place, automation becomes the next step. Gmail filter setup ensures that emails are categorized automatically without requiring daily effort.
How to Set Up Gmail Filters (Step-by-Step Automation Guide)
- Open Gmail.
- Click inside the search bar at the top.
- Select the filter icon on the right side of the search field.
- Define your filter criteria, such as:
- Specific sender email address.
- Keywords in the subject line.
- Words included in the email body.
- Emails with attachments.
- Click “Create filter.”
- Choose the desired actions:
- Apply a label.
- Skip the Inbox (archive automatically).
- Mark as read.
- Star the email.
- Click “Create filter” to confirm.
Now, Gmail will automatically apply the selected rules to incoming emails.
For example, if you get promotional emails frequently then you can create a filter titled “unsubscribe” and set the rule to apply the “Promotions” label while skipping the inbox. This keeps your main inbox clutter free without deleting useful information.
Advanced Gmail Email Management Tips for a Clean Inbox
Once your foundational system is active, you can refine it further to improve efficiency.
Highlight High-Priority Emails Using Gmail Labels
You can create a “High Priority” label and set filters for important contacts. This ensures urgent emails are clearly marked, which makes them easy to identify.
Automatically Archive Non-Essential Emails in Gmail
System notifications, receipts, and tool updates often do not require immediate attention. Applying a label and skipping the inbox keeps your workspace uncluttered while preserving records.
Use Gmail Stars and Labels for Task-Based Email Management
Use stars for action-required emails. For instance, a labeled client email with a star indicates it needs follow-up. This dual system separates categorization from urgency.
Review and Optimize Gmail Filters Regularly
Every few months review your filters to make sure they remain relevant. As your workflows evolve, remove outdated or irrelevant rules and refine criteria again. You can explore Gmail AI features to make automation smarter— from suggested replies to intelligent email categorization that works alongside your filter system. Automation is powerful but only when it is maintained.
Gmail Labels vs Folders: Which Is Better for Inbox Organization?
Many users coming from other email platforms are familiar with folders. Gmail, however, operates differently. Instead of forcing emails into one location, Gmail allows messages to have multiple labels at once. Understanding this difference is essential for building an effective system.
| Traditional Folders | Gmail Labels |
| Email can exist in one folder | Email can have multiple labels |
| Mostly manual sorting | Automatic sorting with filters |
| Rigid structure | Flexible and dynamic |
| Hard to cross-reference | Easy multi-category organization |
An invoice from a client? With folders, you must choose: “Client” or “Finance.” With Gmail labels, it can be both. This flexibility is the foundation of intelligent Gmail email management.
Common Gmail Organization Mistakes to Avoid
If common mistakes are overlooked, even well-designed systems can fail. Below listed key issues can disrupt the effective Gmail organizations:
Creating Too Many Gmail Labels
The sidebar becomes cluttered when users create dozens of highly specific labels. Instead of simplifying email management, it adds mental overhead. A smaller number of broad, flexible categories works far better.
Over-Filtering Important Emails
Aggressive filter rules can accidentally archive critical emails. If you filter too broadly based on keywords, you may miss urgent communication. Always test new filters carefully.
Not Maintaining Gmail Filters
Filters are not permanent solutions. Businesses need to evolve. If you never review your rules, outdated filters can misclassify emails and reduce efficiency over time.
Hiding Important Emails from Gmail Inbox
Some users attempt to hide everything from the inbox. While minimizing clutter is good, completely bypassing the inbox may cause oversight. Maintain visibility for high-priority categories.
Not Testing Gmail Filters After Setup
After implementing filters, many users assume everything is working perfectly. Without testing and occasional review, small errors can persist unnoticed. A strong system requires thoughtful design and occasional refinement.
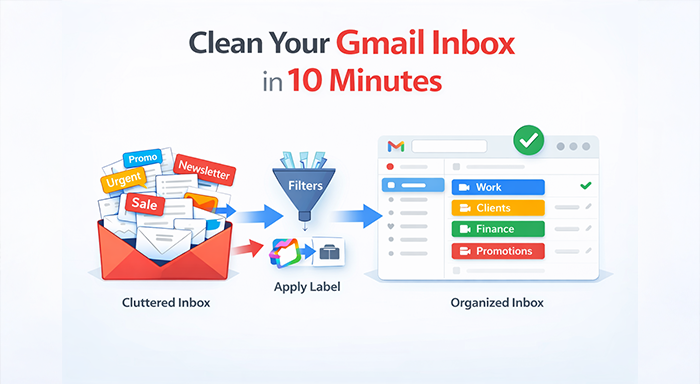
The 10-Minute Inbox Reset Plan for Instant Organization
If your inbox feels overwhelming right now, follow this structured reset process:
- Delete unnecessary labels.
- Create five core categories.
- Set up filters for your top three recurring email types.
- Archive non-essential emails.
- Apply labels manually to recent critical messages.
- Assign colors to priority categories.
- Star emails requiring action.
- Delete spam permanently.
- Review filter rules for accuracy.
- Schedule a quarterly review reminder.
In just ten minutes, you move from reactive clutter to structured clarity.
Final Thoughts: Build a Smart Gmail Inbox Organization System
Organizing your Gmail is more than just deleting thousands of emails or chasing perfection. It constitutes building a system that quietly and effectively manages all information for you, making it easy to find whenever needed. By designing a simple label structure and implementing smart filters, you transform email from a daily stress point into a streamlined workflow tool. Start today. Create five meaningful labels. Set up three essential filters. Take control of your inbox architecture and let automation handle the rest.
FAQs
What is the best way to organize a Gmail inbox?
The best approach is using Gmail labels and filters together. Labels create structure, while filters automate sorting.
How many labels should I create in Gmail?
You can start with 5–8 core labels. Try to keep the system minimal and expand only when necessary.
Can Gmail filters automatically skip the inbox?
Yes. During the Gmail filter setup, you can select “Skip Inbox” to archive emails automatically while applying labels.
Do labels replace folders in Gmail?
Yes. Gmail labels function more flexibly than folders because emails can have multiple labels.
How often should I review my Gmail filters?
You must review them every 3–4 months to ensure rules still match your workflow and priorities.
