
Do you want to simplify your business with Google Workspace setup, but you are not sure where to start? Don’t worry, you are in the right place. This article explains the setup process into simple and user-friendly steps, making sure that you can get productivity tools and professional emails up and running in no time.
What Is Google Workspace?
Google Workspace is a robust suite of tools that can help you simplify your business processes. Irrespective of whether you are managing documents, emails, or calendars, Google Workspace provides a broad range of services to improve productivity. From the following sections, we will understand everything from Google Workspace setup, connecting your domain, accessing your Gmail Business Email, setting up your Google Workspace, to activating Gmail for your domain.
Google Workspace Sign Up Process
Go to the . In this page, you will get in-depth information about the different available packages-
Step 1: Select the Right Package-
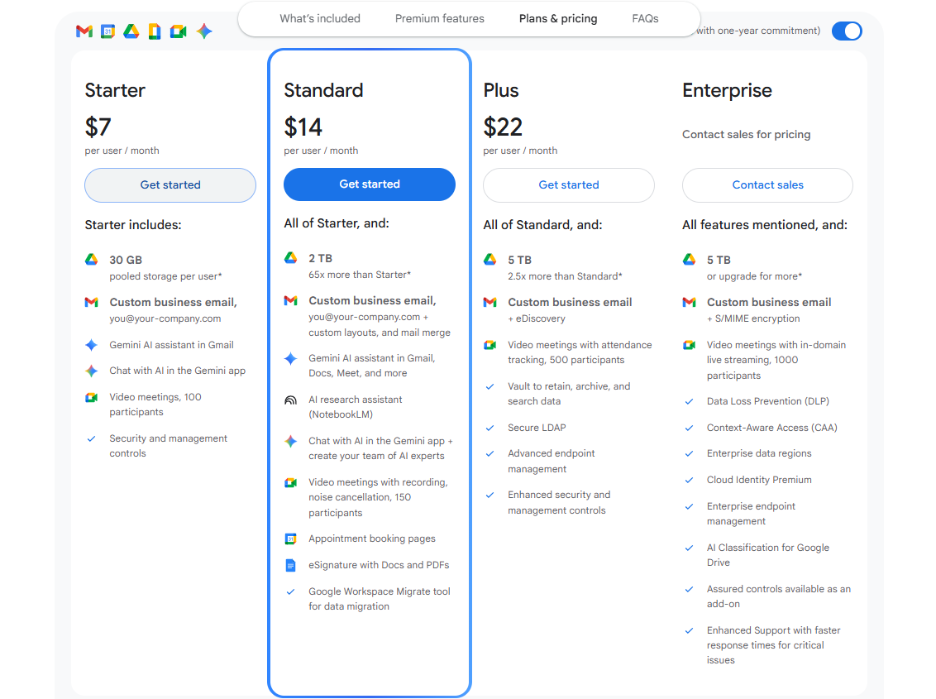
Take some time to explore through diverse packages provided by Google Workspace. For numerous smaller organizations, the “Business Starter” package is a terrific option, providing vital services at a cost-effective price. If your business wants additional features or more storage, you must go for one of the larger plans. Keep in mind that you can always upgrade your plan later if your Google Workspace setup requirements evolve.
Step 2: Begin Your Free Trial-
Once you have chosen your package, select the button titled “Start Free Trial.” This will enable you to experience Google Workspace and its characteristics before committing yourself financially.
Step 3: Provide Your Business Details-
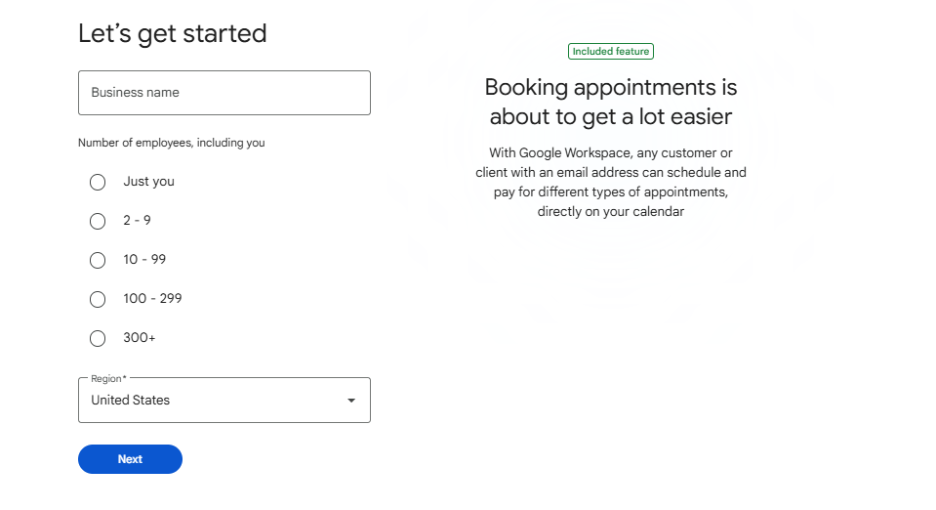
You will be prompted to enter the business details as well as the number of employees. This information aids Google Workspace to personalize the services to your specific requirements.
Step 4: Provide Contact Details-
Now, you need to fill in the contact details. This will be utilized by Google to interact with you regarding the Google Workspace account.
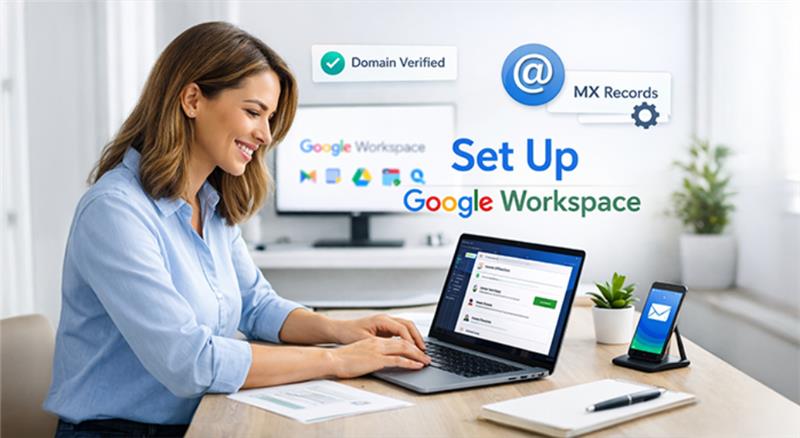
Step 5: Google Workspace Domain Verification-
If your business has a domain already, you will be asked to give confirmation. Your domain is basically the online address where you can find your business.
Step 6: Create Your Account with Your Domain-
Provide your business domain to create your Google Workspace account. Utilizing your own domain aids in ensuring a professional image and ascertaining consistency across business interactions.
Step 7: Secondary Email Address-
For recovery and security purposes, you need to give a secondary email address. This can be utilized to recover your account if you lose access ever.
Step 8: Account Sign In-
Find out how you can log in to your Google Workspace account. This can be via a present Google Account or through creating a new one particularly for your business. It is significant to make sure that you are choosing a strong password as there is a very low chance of your account being compromised.
Step 9: Review Your Plan-
Google Workspace will show you the plan that you have selected, enabling you to review as well as confirm that it aligns with your requirements.
Step 10: Billing and Customer Details-
Provide your billing details and customer data. This information is important to complete the process of setup and kickstart your subscription.
Step 11: Complete Your Google Workspace Setup-
Then, click on “Next” to complete the Google Workspace account. Follow any additional prompts if there are any to complete the entire process.
Connect Your Domain
Once you sign up for Google Workspace setup, the next vital step is to tether your domain to Google Workspace account.
Verify Your Domain
Next to the domain name, you will see the option titled “Verify Your Domain.” Select this to begin the verification process. This is the vital step to ascertain your domain ownership.
Add a CNAME or TXT Record
To validate your domain, you will need to either add a CNAME record or TXT record to the DNS settings of your domain. Such records are given by Google and can be added through the registrar website of your domain. Implement the instructions given by Google to complete this step.
Update MX Records
Once the domain has been verified, the next step is to make sure that your MX record is updated. This is vital for your email to begin working with Google Workspace. Google provides the required MX records and instructions on how you can configure them with your domain registrar.
Access Your Business Email
Once your domain is connected, you can now access your Gmail business email, which is a core part of Google Workspace.
- Go to Gmail:
Access the Gmail login page.
- Sign in:
Sign in using your own business credentials that you create with Google Workspace.
- Explore Gmail Features:
You now have access to all Gmail characteristics, personalized for business use cases. This involves custom email addresses (@yourdomain.com), improved storage space, sophisticated features of security, and more.
Set Up Your Google Workspace
Secure Your Domain
- Click on “Project”
Within the admin console of your Google Workspace, select and click on the option “Protect” for your domain. This is a vital step to protect your domain as well as Google Workspace services.
- Read “Instructions”
A popup will show up with instructions on how to secure your domain. Go through these domains carefully. Once you gain understanding of the instructions, select “I am ready to protect my domain.”
- Access the Domain Settings:
If you have access to the DNS settings of the domain, sign into the control panel of your domain registrar. Then, select “Go to Step 2” from the admin console of your Google Workspace.
- Add a TXT Record:
Google Workspace setup will instruct you to include a TXT record to your domain. They will provide the TXT value, Host Record, and TTL (Time to Live) for this record. If you do not have accessibility to your domain, you will have to send the data to whoever is managing your domain and request them to add it for you.
- Secure Your Domain:
Once the TXT record has been added, select “Protect Domain” in the admin console of Google Workspace.
Create Users
- Add Users:
In the admin console, you can easily include additional email accounts for all your employees. Enter the full name of the user simply and their preferred email address.
- Note Additional Costs:
Note there might be additional costs if you include more email accounts. Consider your requirements and budget whenever you are creating new users.
Set Up Gmail for Your Domain
- Select “Activate”:
Access your Google Workspace admin console. Find the option “Activate” for Gmail and click on it.
- Read and Confirm:
You will see a popup on screen to get confirmation whether you are ready to go ahead. Once you are ready, choose the option “I am ready to activate Gmail.”
- Access Domain Settings:
Just like the domain protection setup, you will need to access the DNS settings of your domain.
- Add MX Records:
Google Workspace will provide you with the MX records you can add to your domain. Such records are vital for directing email to Gmail.
- Activate Gmail:
Once you add MX records to your domain, select “Activate Gmail” in the admin console. Google can then begin to check to make sure that the records are correct. Additionally, it can take some time for such modifications to take place, so you might have to wait some time and check again.
Additional Tips for Google Workspace Setup
- Migrate Your Present Email: You can easily import your emails from your old email account to the new Google Workspace account.
- Sign into Google Console: To ensure any changes to your account in future, you first need to sign in to your Google console, which is linked to the main email address that you had first created.
- Google Workspace Admin Setup: Access admin account, click on your profile, a dropdown will appear, and then you need to select the option “Admin Console.”
- Access Google’s 24-hour Chat: Choose Google’s 24-hour chat that can help you if you run into any problems. You can access 24-hour chat by accessing admin console and selecting the question mark icon appearing on the top right corner.
- Set Up 2-Factor Authentication: Establish 2-factor authentication that can help you secure your account. Set up more cybersecurity measures to make your account further secure. Check out a detailed blog on cybersecurity to understand fundamentals and principles.
- Modify DNS Records: When you are modifying DNS records, you will have to wait for them before they show up. It can take up to 20 minutes. In some cases, it can take as much as 48 hours.
Conclusion
Google Workspace setup for your business does not have to be an overwhelming task. From implementing such steps, i.e., from choosing the right plan and validating domain to setting up MX records and activating Gmail, you can have a professional and completely functional system running quickly. With collaborative tools, in-built features, and 24/7 support, Google Workspace sets up your business for lasting efficiency. Take one step at a time, and you will have all aspects operational more quickly than you think.